Blockouts
Refer to Schedule Setup for information on setting up overall Appointment schedules. It allows you to skip the days the office is closed. The following describes adding blockout times and to edit existing blockouts.
Add Blockouts or Blocks of Time

Blocks of time may be added only where existing blocks of time do not already exist.
- Go to the appointment scheduler and right-click on the area to be blocked out for any reason including reserved for a certain procedure category. Make sure to enter some blockout types under Setup - Definitions.
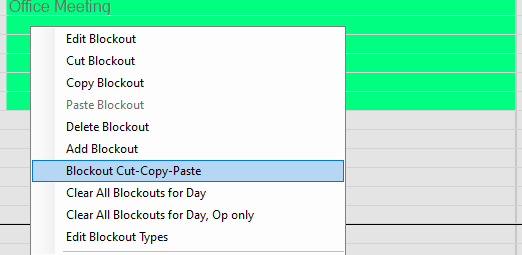
- Select "Add blockout" to add a block for a selected day or days of a week.
Copy/ Paste Blockouts

Caution: Once blockouts are entered for several weeks, the blockouts can only be deleted one at a time.
Right-click on a Blockout. Select ‘Blockout Cut-copy-Paste’ to create blockouts for selected days of every week.

The following dialogue will open.
After adding blockouts for a week, click on "Copy Week." Enter the number of repeats e.g. 52 weeks for a year or 104 for two years. Then click on Repeat.
Delete a Blockout
- Right-click on the Blockout and Click on the "Delete."
- Repeat the above step for every Blockout to be deleted.
Related Articles
Schedule Setup
Set the time that your office opens, takes lunch, and closes each day. Use the copy/paste/repeat features to quickly fill the actual schedule. This is very powerful and allows any kind of rotating or alternating schedule by provider, by day of the ...Edit Patient Info
There are several ways to access the "Edit Patient Information" Window: While in the Family Module, by double-clicking the Patient Information grid. While in the Chart Module, by double-clicking the Patient Info grid. When adding a new patient by ...Insurance Plan
Every insurance plan has one subscriber and can be attached to multiple patients, but a plan is never shared between subscribers. There is no limit to the number of plans a family can have. If a patient changes their coverage, the old plan is not ...Insurance Categories
In the upper left of the Practice-Web Dental screen, click on "Setup." A drop-down menu will open. Click on "Insurance Categories" to bring up the following window. These are the insurance coverage categories for the practice. There are two setup ...Exam Sheet
Exam Sheets are customizable documents used to track exam findings. They're generated in the Chart Module and support Electronic Signatures. Completed Exam Sheets can be viewed in: Progress Notes in the Chart Module Communications Log in the Account ...